Description
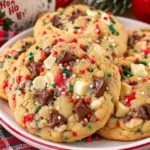
Christmas Chocolate Chip Cookies are a delicious twist on the classic chocolate chip cookie, made extra festive for the holiday season. These cookies are soft and chewy in the center, lightly crisp around the edges, buttery, rich, and packed with plenty of melty chocolate chips. A sprinkle of red and green holiday sprinkles gives them a cheerful Christmas appearance that makes them perfect for cookie exchanges, Christmas parties, holiday dessert trays, and homemade gifts.
Ingredients
For the Christmas Chocolate Chip Cookies:
- 1 cup unsalted butter, softened
- ¾ cup granulated sugar
- ¾ cup packed light brown sugar
- 2 large eggs, room temperature
- 2 teaspoons vanilla extract
- 2 ¾ cups all-purpose flour
- 1 teaspoon baking soda
- ½ teaspoon baking powder
- ½ teaspoon salt
- 1 ½ cups semi-sweet chocolate chips
- ½ cup milk chocolate chips
- ½ cup red and green Christmas sprinkles
Optional:
- ½ cup white chocolate chips
- Extra chocolate chips for topping
- Extra red and green sprinkles for decorating
- A pinch of flaky sea salt for finishing
Instructions
Preheat your oven to 350°F (175°C). Line two large baking sheets with parchment paper or silicone baking mats. This helps prevent the Christmas cookies from sticking and makes cleanup easier.
In a large mixing bowl, beat the softened butter, granulated sugar, and brown sugar together until light, creamy, and fluffy. This usually takes about 2–3 minutes with an electric mixer.
Creaming the butter and sugar properly helps create the soft and chewy texture that makes homemade chocolate chip cookies so delicious.
Add the eggs one at a time, mixing well after each addition. Add the vanilla extract and mix until everything is smooth and well combined.
Scrape down the sides of the bowl if necessary to make sure all of the ingredients are evenly incorporated.
In a separate medium bowl, whisk together the all-purpose flour, baking soda, baking powder, and salt.
Combining the dry ingredients separately helps distribute the leavening agents and salt evenly throughout the cookie dough.
Gradually add the flour mixture to the butter mixture. Mix on low speed just until the flour disappears.
Do not overmix the dough. Overmixing can develop too much gluten and result in cookies that are less tender.
Fold in the semi-sweet chocolate chips and milk chocolate chips using a spatula or wooden spoon.
For an even richer Christmas cookie, you can replace some of the chocolate chips with white chocolate chips.
Gently fold the red and green Christmas sprinkles into the cookie dough.
Avoid overmixing after adding the sprinkles because some sprinkles can release their color into the dough.
For thicker, chewier cookies, refrigerate the dough for about 20–30 minutes before baking.
Chilling the dough helps prevent the cookies from spreading too much and allows the flavors to develop.
If you’re short on time, you can bake the cookies immediately, although chilled dough generally produces thicker cookies.
Use a cookie scoop or tablespoon to portion the dough into balls. Place the cookie dough balls on the prepared baking sheets, leaving about 2 inches of space between each cookie.
For bakery-style Christmas cookies, use approximately 2 tablespoons of dough per cookie.
Before baking, press a few extra chocolate chips and Christmas sprinkles onto the tops of each dough ball.
This gives the finished cookies a more attractive appearance and makes the chocolate chips visible on top.
Bake the cookies for approximately 10–12 minutes, or until the edges are lightly golden while the centers still look slightly soft.
Do not overbake the cookies. They will continue to set as they cool on the baking sheet.
Allow the cookies to cool on the baking sheet for about 5 minutes. Then carefully transfer them to a wire cooling rack.
The cookies may appear slightly underbaked in the center when they first come out of the oven, but this is what helps create their soft and chewy texture.
Once the Christmas Chocolate Chip Cookies have cooled, they are ready to serve.
For an extra festive presentation, arrange them on a Christmas platter with other holiday cookies, brownies, fudge, and candies.
Notes
For the softest Christmas Chocolate Chip Cookies, avoid overbaking them. The edges should be lightly golden while the centers should still look slightly soft when you remove the cookies from the oven.
Room-temperature butter is important because it creams properly with the sugar. Avoid using melted butter unless the recipe is specifically adjusted for it, as melted butter can cause the cookies to spread more.
If your kitchen is warm or your dough seems very soft, chill it for 30–60 minutes before baking. Chilled dough helps create thicker cookies with a chewy center.
For bakery-style cookies, gently press a few additional chocolate chips onto the tops immediately after the cookies come out of the oven.
- Prep Time: 20 minutes
- Cook Time: 10–12 minutes
Nutrition
- Calories: 220 kcal
- Sodium: 130 mg
- Protein: 2.5 g