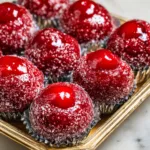
Ingredients
For the Cherry Filling
- 4 ounces cream cheese, softened
- 4 tablespoons unsalted butter, softened
- 1 teaspoon pure vanilla extract
- 1/4 teaspoon almond extract (optional)
- 3 1/2 cups powdered sugar, plus more if needed
- 3/4 cup maraschino cherries, finely chopped and thoroughly drained
- 1 tablespoon maraschino cherry juice, optional
For the Chocolate Coating
- 16 ounces white chocolate melting wafers
- 1 teaspoon coconut oil, if needed for thinning
For Decoration
- 2 tablespoons red and green Christmas sprinkles
- 2 ounces melted semi-sweet chocolate for drizzling, optional
- A few finely chopped, well-drained maraschino cherries
Instructions
Drain the maraschino cherries using a fine-mesh strainer.
Finely chop them into small pieces, then spread them between layers of paper towels. Gently press to remove as much moisture as possible.
This step is important because excess cherry juice can make the filling too soft and prevent the candies from holding their shape.
Set the prepared cherries aside.
Step 2: Make the Creamy Filling
In a large mixing bowl, beat the softened cream cheese and butter together with an electric mixer until smooth and creamy.
Add the vanilla extract and optional almond extract. Mix until combined.
Gradually add the powdered sugar, about one cup at a time, mixing on low speed after each addition.
Continue mixing until a thick, soft dough forms. It should be firm enough to roll into balls without sticking excessively to your hands.
Step 3: Fold in the Cherries
Gently fold the chopped, dried maraschino cherries into the cream cheese mixture using a spatula.
Distribute the cherry pieces evenly throughout the filling.
If the mixture feels too soft, add additional powdered sugar one tablespoon at a time until it becomes manageable.
Avoid adding too much cherry juice because the moisture can affect the consistency.
Step 4: Chill the Filling
Cover the bowl with plastic wrap and refrigerate for approximately 45–60 minutes.
Chilling allows the butter and cream cheese to firm up, making the mixture easier to handle.
Step 5: Shape the Christmas Bombs
Line a baking sheet with parchment paper.
Scoop approximately one tablespoon of filling at a time and gently roll it between your palms to form smooth balls.
Place each ball on the prepared baking sheet, leaving a little space between them.
Once all the balls are shaped, refrigerate them for another 30 minutes or until firm.
Step 6: Melt the White Chocolate
Place the white chocolate melting wafers in a microwave-safe bowl.
Microwave in 20-second intervals, stirring thoroughly after each interval until the chocolate is completely melted and smooth.
If the chocolate is too thick for dipping, stir in a small amount of coconut oil.
Avoid overheating the chocolate because white chocolate can scorch easily.
Step 7: Dip the Cherry Bombs
Remove the chilled cherry balls from the refrigerator.
Using a dipping fork or two regular forks, lower each ball into the melted white chocolate.
Turn gently until completely coated, then lift it out and allow the excess chocolate to drip back into the bowl.
Place each coated ball onto the parchment-lined baking sheet.
Work in small batches and keep the remaining filling refrigerated so it stays firm.
Step 8: Decorate for Christmas
While the white chocolate coating is still wet, sprinkle the tops with red and green Christmas sprinkles.
For a beautiful finishing touch, drizzle melted semi-sweet chocolate over the candies.
You can also add a tiny piece of well-drained cherry to the top of each candy for an extra festive appearance.
Step 9: Chill Until Set
Place the baking sheet in the refrigerator for approximately 20–30 minutes, or until the chocolate coating is completely firm.
Once set, transfer the Cherry Christmas Bombs to an airtight container and refrigerate until ready to serve.
Notes
- Dry the cherries thoroughly: Excess moisture is the biggest challenge when making cherry-filled candies.
- Use softened ingredients: Butter and cream cheese should be soft enough to mix smoothly but never melted.
- Chill before shaping: Cold filling is much easier to roll.
- Keep the chocolate warm, not hot: Overheated white chocolate becomes thick and difficult to work with.
- Use melting wafers: They are convenient for dipping because they set without traditional tempering.
- Work in batches: Keep the remaining cherry balls refrigerated while dipping.
- Decorate immediately: Sprinkles stick best before the chocolate coating hardens.