Ingredients
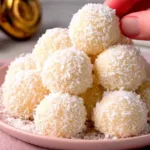
This simple recipe uses two basic ingredients to create approximately 18 to 22 coconut balls, depending on their size.
The Two Ingredients
- 3 cups sweetened shredded coconut: Provides the main flavor and chewy texture. Reserve a little extra if you want to roll the finished balls in coconut.
- 1 can (14 ounces) sweetened condensed milk: Binds the coconut together and creates a rich, creamy sweetness.
That’s all you need for the basic recipe!
Instructions
Place the shredded coconut in a large mixing bowl.
If the coconut contains large clumps, separate them gently with a fork. This helps the condensed milk distribute evenly throughout the mixture.
Reserve approximately 1/2 cup of coconut in a separate bowl if you want to coat the finished balls.
Step 2: Add the Sweetened Condensed Milk
Pour the sweetened condensed milk over the shredded coconut.
Using a sturdy spatula, stir until the coconut is evenly coated and the mixture becomes thick, sticky, and moist.
Start with most of the can and add the remaining condensed milk gradually. Depending on the brand and texture of your coconut, you may not need every drop.
The mixture should hold together when pressed between your fingers without feeling overly wet.
Step 3: Chill the Mixture
Cover the bowl with plastic wrap or a lid.
Place it in the refrigerator for approximately 20 to 30 minutes. Chilling helps the coconut absorb some of the condensed milk and makes the mixture easier to handle.
If the mixture still feels too sticky after chilling, add a little extra shredded coconut and mix again.
Step 4: Shape the Coconut Balls
Line a baking sheet or large tray with parchment paper.
Scoop approximately 1 tablespoon of the coconut mixture and roll it gently between your palms to create a round ball.
If the mixture sticks to your hands, lightly dampen your palms with water or grease them with a tiny amount of neutral oil.
Continue shaping until all the mixture has been used. Aim for evenly sized balls so they look attractive on a serving platter.
Step 5: Coat with Extra Coconut
Place the reserved shredded coconut in a shallow bowl.
Roll each coconut ball gently in the coconut until the outside is completely covered.
This optional step gives the treats a beautiful snowy finish and makes them easier to handle.
If you prefer a smoother appearance, you can skip this step and leave the balls as they are.
Step 6: Chill Until Firm
Arrange the finished coconut balls on the parchment-lined tray.
Refrigerate for another 30 to 45 minutes, or until they are firm enough to handle without losing their shape.
Once chilled, transfer them to a serving plate or airtight container.
Step 7: Serve and Enjoy
Serve the coconut balls chilled or slightly softened at room temperature.
For a festive presentation, place each one in a small white paper candy cup and arrange them on a Christmas dessert platter.
Their simple snowy appearance makes them look beautiful alongside chocolate truffles, fudge, and other homemade holiday candies.
Notes
- Use sweetened shredded coconut: It provides the best texture for this simple recipe.
- Add condensed milk gradually: Different coconut brands absorb moisture differently.
- Don’t make the mixture too wet: A thick, sticky mixture is easier to roll than a loose one.
- Chill before shaping: Cold coconut mixture is much easier to handle.
- Use slightly damp hands: This helps prevent the mixture from sticking to your palms.
- Keep the balls uniform: A small cookie scoop makes portioning easier.
- Roll in extra coconut: This creates a beautiful finish and reduces stickiness.
- Refrigerate before serving: Chilling helps the coconut balls hold their shape.